
I’ve been playing Intelligent Systems’ Fire Emblem games recently. It’s hard not to appreciate how the tactical movement gives depth and immersion to a Game Map that’s visually just a handful of pixels compared to modern game landscapes like Red Dead Redemption 2 or Breath of the Wild. Considering units’ positioning down to choices between adjacent grid cells gets a player intimately engaging with the game environment.
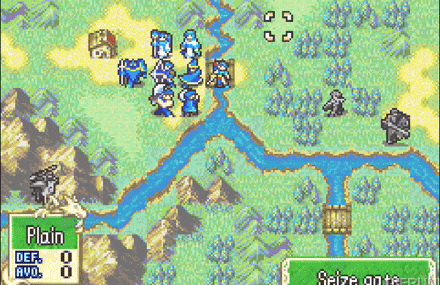
Notice that when the player selects a unit to move them, it displays a grid. This grid depicts grid cells the player can move to in blue, and grid cells they can attack in red. This display is integral to the strategy of Fire Emblem, as it gives the player a clear yet informative summary of their tactical options.
I wanted to recreate the effect myself, with an added optimization challenge; have the whole algorithm run on the GPU with a pixel shader.
Why the GPU?
Speed is a concern, since moving units is a common command. The game freezing up every time you click on a unit to move is unacceptable. This also can’t be solved with multithreading instead, because the game needs to show where a unit can travel immediately upon clicking on it. In conclusion, our solution must run fast on the main thread using a pixel shader.
Expected Behavior
Firstly, let’s review the needs and expected behavior of the system:
- The world is organized into grid cells. Each grid cell has an integer Movement Cost (1, 2, 4, or 8), or is a wall that cannot be moved upon or through.
- There are Units that live in individual grid cells, and can move to other grid cells. Units can only move up, down, left or right. “Diagonal” movements are counted as moving two grid cells.
- Each Unit has an integer Movement Range. This means that they may travel as far as the sum of the travelled grid cells’ Movement Costs is less than or equal to their Movement Range.
- A Unit will be able to move at least one grid cell away from their starting one, even if their Movement Range is less than the cost of that cell’s Movement Cost.
- Units additionally may Attack up to an integer Attack Range grid cells away from their ending position. Attack Range ignores Movement Cost and walls.
Dijkstra’s Algorithm
The needs and expected behavior denote two specific problems:
- How can we find every accessible point given a starting cell and movement range?
- How can we trace this point back to the starting point?
This is best done with Dijkstra’s Algorithm because it’s essentially built to solve this problem.

Here is a brief paraphrased refresher on Dijkstra’s as it applies to our problem. This is for newcomers… or if your memory of sophomore-year algorithms class is getting hazy.
- Start with every cell marked open, other than a start point cell, which is closed. We will “close” nodes as we visit them to keep track of where we’ve been.
- Assign to every cell a Travel Cost value. This defaults to infinity for every cell other than the starting cell, which is zero. This value represents the shortest possible path to reach this cell from the starting cell.
- For a current node, consider all open neighbors. If an open neighbor could be given a Travel Cost less than the one it currently has by virtue of travelling there from the current node, assign it the newer Travel Cost. Close the current node.
- Repeat step 4 for every open neighbor of the current cell in a breadth-first search. Stop when cells whose Travel Cost exceeds the Movement Range are reached.
- After this process, every “closed” cell can be travelled to, and each contains a Travel Cost defining how much of the Movement Range is expended to reach it. (This is loosely paraphrased from the Wikipedia article on Dijkstra’s algorithm)
Running an algorithm on a Pixel Shader
Dijkstra’s algorithm is cool and all but… how do we run that on a pixel shader? The algorithm asks for maintaining a set of closed cells, and shaders can’t really keep consistent state like that. It also involves a Breadth-first search, which would be best done in a loop. As it’s currently defined, a pixel shader is incapable of adapting Dijkstra’s algorithm.
So, we’ll have to think outside the box… and flip the script.
Bottoms-up Dijkstra's Algorithm
This is bottoms-up because open cells who notice a closed neighbor drive themselves, instead of closed cells finding open neighbors. This works great for a pixel shader where we need to run an identical instruction on every cell and can’t rely on holding list states.
Pseudocode:
if(current is Wall or current is Closed or all neighbors are Open)
	return

if(up_neighbor is closed && up_neighbor.travelCost is least)
	current.nearestNeighbor = up
	current.travelScore = up_neighbor.travelScore + up_neighbor.cost

/* repeat the above if statement for down, left, right */

if(current.travelScore <= movementRange)
	close(current)
Holding Dijkstra State in an 8-bit RGBA Texture
We can’t rely on holding state externally to the texture. Instead, we will find clever ways to use all 4 channels in the 8-bit texture in order to store state.
The only offline information we need for a Map is the Movement Cost of each cell and whether or not it’s a wall. This will be stored in the Red channel, as follows:
\[MC= \begin{cases} 1 & 0.0 \leq R < 0.2 \\ 2 & 0.2 \leq R < 0.4 \\ 4 & 0.4 \leq R < 0.6 \\ 8 & 0.6 \leq R < 0.8 \\ Wall & 0.8 \leq R < 1.0 \\ \end{cases}\]Which can be simplified to:
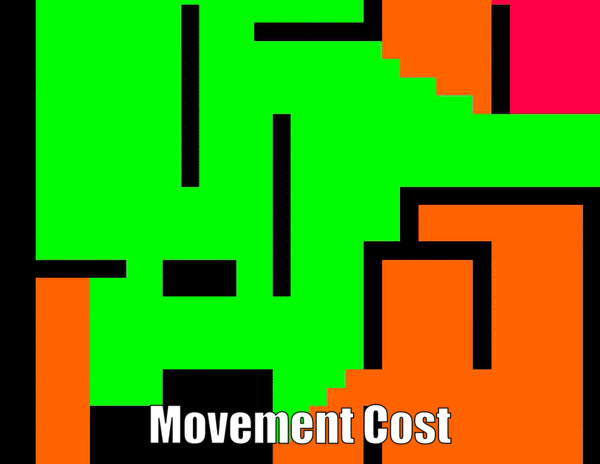
\[MC=\begin{cases} 2^{ceil(5*R)-1} & 0.0 \leq R < 0.8 \\ Wall & 0.8 \leq R < 1.0 \\ \end{cases}\]In a real game, this Red Channel will be populated by sampling the tile map of the game world. For the purposes of this demo, I’ll draw up a sample map in Photoshop instead.
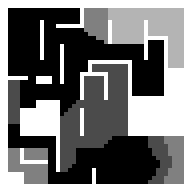
Here is the test map I drew, stored in the Red channel but displayed in greyscale for clarity. It’ll work well for testing purposes, although I can’t say Shouzou Kaga would be proud of the design. As you can see, the absolute black and shades of grey define grid cells that may be travelled to and their Movement Cost, whereas the absolute white defines impassable walls.
With the Movement Cost stored in the Red Channel, that leaves the other three channels (GBA) to hold state.
G: During algorithm, will be used to mark open/closed cells. After algorithm completion, acts as a mask for entire travelable area.
\[Mask=\begin{cases} Open / Untravelable & G = 0.0 \\ Closed / Travelable & G = 1.0 \\ \end{cases}\]B: Travel Cost.
\[TC=B*255\]A: Points to nearest neighbor (lowest travel cost). When the player picks a point, this will be traced to move the Unit to that location.
\[NN=\begin{cases} Up & 0.0 \leq A < 0.2 \\ Down & 0.2 \leq A < 0.4 \\ Left & 0.4 \leq A < 0.6 \\ Right & 0.6 \leq A < 0.8 \\ N/A & 0.8 \leq A < 1.0 \\ \end{cases}\]Now that we know how to use the texture, we can define our pixel shader’s behavior. Instead of travelling top-down from the starting cell, the pixel shader will apply an iterative process to the entire image. This single iteration will use a plus-shaped kernel to convolve the image.
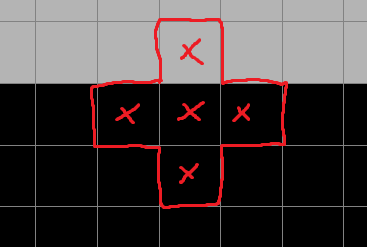
What is a kernel?
A kernel describes a certain shape for sampling around the current pixel when running a pixel shader. Usually, this is a square with specified dimensions. For example, a simple box blur uses a 3x3 kernel to sample the 9 pixels surrounding a pixel and average them to achieve a blurring effect. In our case, we use a 3x3 plus-shaped kernel because Units can only move up, down, left and right, not diagonally.
Now that we know our kernel, lets write the pass.
Helper Functions
I started by implementing some simple helper functions that keep the code demystified.
float pack255(float val) { return val / 255.0; }
float unpack255(float val) { return val * 255.0; }
float getMoveCost(fixed4 col) { return max(1.0, pow(2,ceil(col.r * 4.99)-1)); }
bool isWall(fixed4 col) { return unpack255(col.r) >= 200; }
bool isOpen(fixed4 col) { return col.g <= 0.01; }
void close(inout fixed4 col) { col.g = 1.0; }
Defining the Kernel
Then, in the fragment shader, I define the kernel by sampling the four points necessary: up, down, left and right.
const float2 cell_size = _MainTex_TexelSize.xy;
fixed4 col = tex2D(_MainTex, i.uv);
const fixed4 col_u = tex2D(_MainTex, i.uv + cell_size * float2(0.0, 1.0));
const fixed4 col_d = tex2D(_MainTex, i.uv + cell_size * float2(0.0, -1.0));
const fixed4 col_l = tex2D(_MainTex, i.uv + cell_size * float2(-1.0, 0.0));
const fixed4 col_r = tex2D(_MainTex, i.uv + cell_size * float2(1.0, 0.0));
Guard Clause
We check for if the cell is closed, a wall, or if all neighbors are open.
if(!isOpen(col) || isWall(col) || max(max(col_u.g, col_d.g), max(col_l.g, col_r.g)) <= 0.01)
return col;
Reverse Dijkstra
Now, for the main operation: find the neighbor with the least Travel Cost, and update our own Travel Cost by adding the Movement Cost to it. Keep in mind that the B channel stores Travel Cost and the A channel stores Nearest Neighbor.
const float tc_u = unpack255(col_u.b);
const float tc_d = unpack255(col_d.b);
const float tc_l = unpack255(col_l.b);
const float tc_r = unpack255(col_r.b);

float min_tc = 9999; // minimum travel cost
float mc = 0.0; // movement cost

// If closed and travel value < minValue
if(!isOpen(col_u) && tc_u < min_tc)
{
	min_tc = tc_u;
	mc = getMoveCost(col_u);
	col.a = 0.1;
}
if(!isOpen(col_d) && tc_d < min_tc)
{
	min_tc = tc_d;
	mc = getMoveCost(col_d);
	col.a = 0.3;
}
if(!isOpen(col_l) && tc_l < min_tc)
{
	min_tc = tc_l;
	mc = getMoveCost(col_l);
	col.a = 0.5;
}
if(!isOpen(col_r) && tc_r < min_tc)
{
	min_tc = tc_r;
	mc = getMoveCost(col_r);
	col.a = 0.7;
}
Finalize Pass
Finalize setting our own Travel Cost. Importantly, only close the cell if the Travel Cost is less than the Movement Range; this ensures that we can’t travel beyond the Movement Range’s scope.
const float tc = min_tc + mc;
col.b = pack255(tc);
if(tc <= _MoveRange)
	close(col);
return col;
Iterations
This shader pass only counts for a single iteration, though. For the algorithm to work, we have to run the texture through this pass for a movement range number of iterations.
for(int i = 0; i < movementRange; i++)
{
	Graphics.Blit(mRenderTexture, tempRT, mAlgorithmMaterial);
	Graphics.Blit(tempRT, mRenderTexture);
}
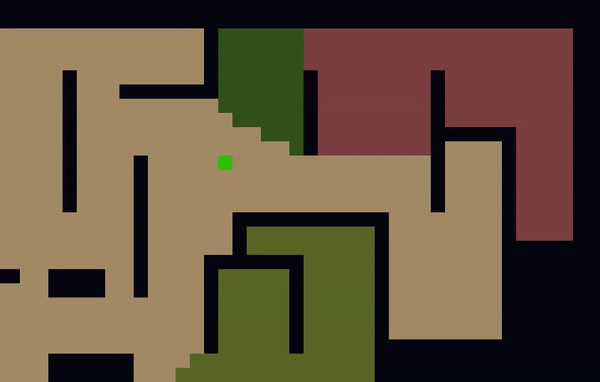
And… the result:
Although the above gif is slowed down for clarity, the actual algorithm runs lightning fast. For expected use-cases of Movement Ranges under 32, I consistently get <0.2ms of total runtime.
Attack Ranges
We’re over the hard part, but still need the attack ranges. These are the little red squares that show how far a Unit can attack if they move to the very edge of their Movement Range.
Luckily, this is quite simple. Since the Attack Range ignores Movement Cost and walls, we don’t need to do any pathfinding of any sort. Instead, we will convolve the G channel of the Reverse Dijkstra result with an expansion formula, using the same plus-shaped kernel.
Expansion
fixed4 col = tex2D(_MainTex, i.uv);
const float2 cell_size = _MainTex_TexelSize.xy;
const float down = tex2D(_MainTex, i.uv + cell_size * float2(0.0, -1.0)).g;
const float left = tex2D(_MainTex, i.uv + cell_size * float2(-1.0, 0.0)).g;
const float right = tex2D(_MainTex, i.uv + cell_size * float2(1.0, 0.0)).g;
const float up = tex2D(_MainTex, i.uv + cell_size * float2(0.0, 1.0)).g;
const float maximum = max(max(down, left), max(up, right));
col.g = max(col.g, min(0.5, maximum));
return col;
This will simply take any pixel with a value greater than 0.5 and set the neighboring pixels to 0.5. The effect will look like an expansion.
Perfect! Now the effect is complete.
Conclusion

Here is the demonstration of the final effect.
In the future for my tactics side-project, I’ll add:
- Red Channel auto-generation from world map contents
- Pretty in-game shader to display this grid to the player
- Arrow tracing player start to destination
Thank you for reading my blog. If you were impressed and are an employer, consider hiring me as a Graphics Programmer (My LinkedIn).
Otherwise, follow me @wheatpenguin on Twitter.
Comments